upload mailchimp email to blog wordpress mailchimp automatic newsletter
Allowing people to receive your latest WordPress weblog posts by email is a great way to build a following. Forget about RSS, Twitter etc. Some people just like to read the latest manufactures from your website using good old-fashioned email. Electronic mail marketing tools have always been a great way to share updates with your users and notify them of the latest trends and here is a list of the best email marketing services.
Today, I'grand going to share 2 easy ways to send WordPress weblog posts by email:
- Use the MailOptin WordPress plugin
- Use MailChimp (no plugins needed!)
You'll learn how to electronic mail new web log posts to subscribers - either globally or specific categories only. I'll also share some handy tips on how to take your blog posts by electronic mail to a new level. For example, I'll tell you lot how to create a individual members-but blog and email it to approved members simply.
Let's get started.
Should I utilize MailChimp to send new blog posts?
Commencement, let'due south talk through the different ways to ship new blog posts via email.
WordPress plugins
There are several plugins which let yous to send 'new post' emails directly from your WordPress website - JetPack Subscriptions and Subscribe2 beingness some of the main players:
- JetPack Subscriptions can't be branded and allows your visitors to subscribe to your sites and other WordPress blogs nether a single business relationship. This may not be appropriate for a corporate blog.
- Subscribe2 requires a lot of custom evolution to look professional person. The 'Manage My Subscriptions' page is in the WordPress admin rather than on the front end of your website. This isn't appropriate for well-nigh websites.
Some other problem with sending majority emails direct from your WordPress website is that your emails are more likely to be spammed. You tin can add features such as SMTP mail to increase e-mail deliverability. All the same, WordPress is not a specialist email platform.
Some WordPress hosting companies such equally WP Engine or Kinsta (our recommended host) don't even allow you to send mass emails directly from your website. This is because it uses a lot of server resources and can deadening downward your website.
If you want a WordPress plugin to exercise this for you, and then I recommend using MailOptin with MailChimp instead. I tell you how in Method two of this tutorial. This sends the emails using MailChimp instead of WordPress, therefore avoiding these problems.
Dedicated mailing list platforms
It's ameliorate to utilize a specialist mailing list provider to electronic mail your subscribers when you publish a new WordPress web log mail service. Their servers are configured to maximise deliverability so your emails are less likely to exist flagged as spam. They too have born features to aid you comply with data protection legislation. And you also become professional options for electronic mail templates that aren't available with nigh WordPress plugins.
MailChimp is the earth's leading mailing list provider and is complimentary until yous have 2,000 subscribers. Side by side, I will draw ii easy methods to set MailChimp to send WordPress weblog posts by email. Read through both and choose the method that best matches your needs.
Getting started
If you haven't already started using MailChimp, follow these steps to get ready. You need to exercise this whether you lot're using Methods i or 2 of this tutorial.
Create a MailChimp account
First, go to mailchimp.com and create an account. It's free to gear up up and you lot will but ever accept to pay annihilation to MailChimp if you take especially loftier numbers of emails or subscribers (view their pricing page to see if this will apply to you).
Create an Audition
Go to the Audience department of your MailChimp business relationship and create a new audience (previously called 'listing' in MailChimp - they changed it in 2019). This is where all your subscribers will exist stored.
Follow the instructions to set up and configure a new audience.
Import your subscribers
If you take existing subscribers that you wish to import to MailChimp, create a CSV file containing the data for your subscribers. There should be i column for each field - for example column 1 would include your subscribers' email addresses (1 per row), column 2 would be their first names and column 3 would contain their final names, if these are the fields y'all wish to store. (If you don't know how to create a CSV file, create an Excel spreadsheet with all your contacts, go to File > Salve Every bit and choose the '.csv' file type.)
Go to the Audience department of your MailChimp account and click on your audience. Click 'Import subscribers' from the 'Add subscribers' dropdown listing. Follow the instructions to upload your CSV file. MailChimp will ask you to match the columns in the CSV file with the fields for your MailChimp audition, then you tin can go ahead with the import. MailChimp will tell you if in that location are whatsoever problems with the data.
Note: Your subscribers will NOT receive an e-mail to tell them that they have been imported into your MailChimp audience.
Later in this tutorial, I'll tell you how to add together a MailChimp signup form to your WordPress blog.
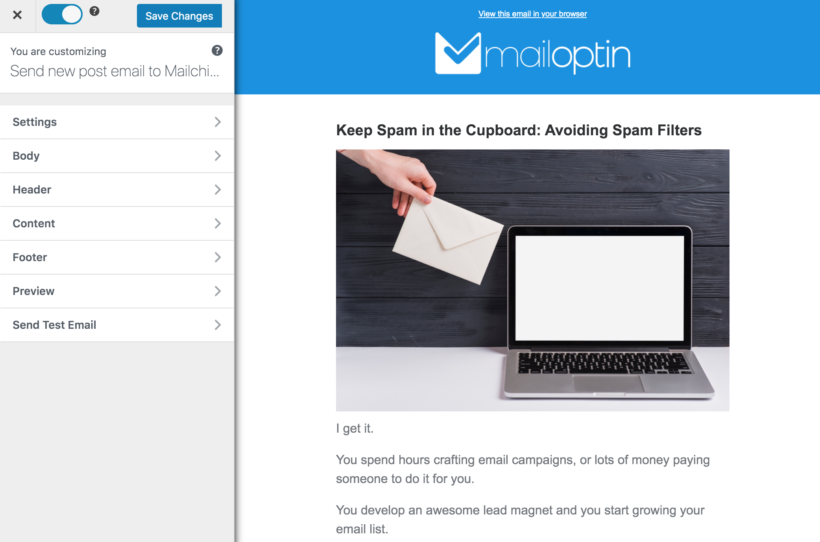
Method 1: Utilise the MailOptin plugin
MailOptin is a WordPress plugin that automatically emails your blog posts to your Mailchimp subscribers. You can choose whether to ship the email equally before long as each blog post is published, or as a daily, weekly and monthly newsletter roundup of your posts.
MailOptin is very easy to fix. It doesn't require any coding cognition.
To send e-mail notification of new blog posts, you'll need the Pro or Agency plan. Go the plugin, login to your WordPress site and install and actuate it.
Pace 1 - Connect MailOptin to your Mailchimp account
Firstly, you need to get your Mailchimp API fundamental:
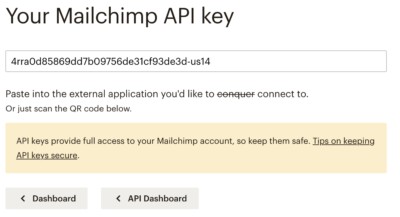
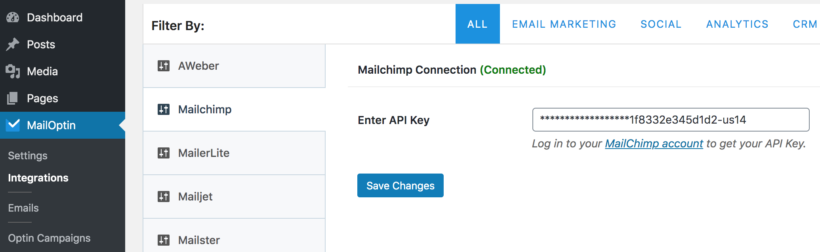
- Go to 'Integrations' under the MailOption Dashboard menu.
- Click on the MailChimp tab to reveal the settings. Enter your API cardinal and hit the 'Salve Changes' button.
Step 2 - Set upwards a new post notification e-mail automation
Next is to prepare the email automation that will be responsible for emailing your MailChimp subscribers when you lot publish a new postal service.
- Click 'Emails' nether the MailOptin Dashboard menu.
- Click on the 'Add together New' button at the summit and select 'Email Automation'.
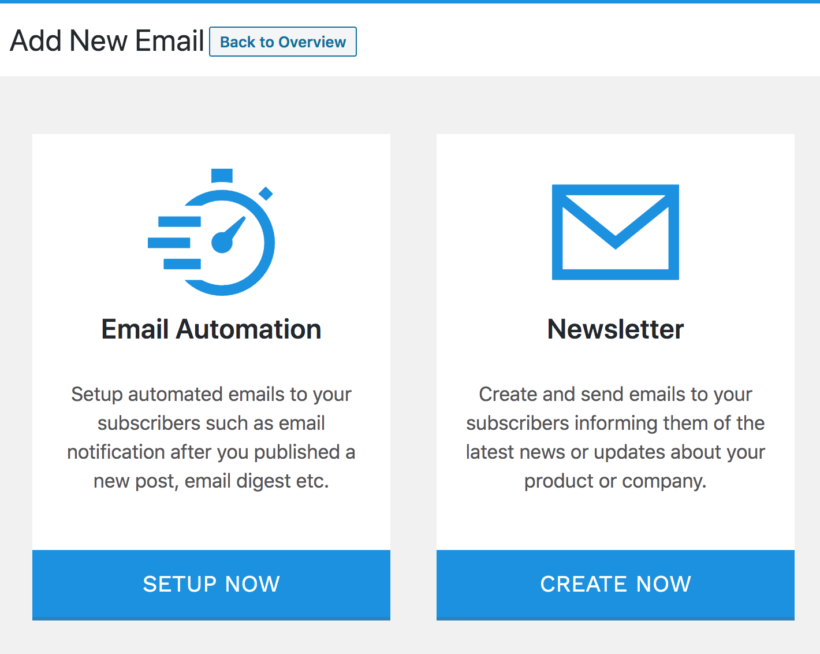
- Enter a title for the campaign and select a type:
- Cull 'New Post Notification' to send the email every bit soon equally a new post is published.
- Select 'Posts Email Digest' to create a daily, weekly or monthly newsletter digest of your posts.
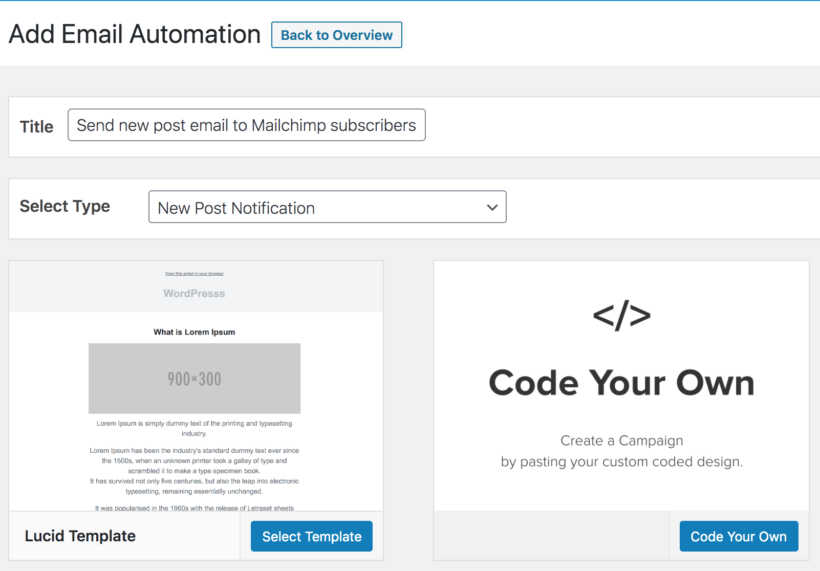
- Now select a template. You will and so be redirected to the electronic mail builder.
- On the electronic mail builder, use the Body, Header, Content and Footer panels to customize the email template to your heart's content. Yous have options to change colors, add a header paradigm, add together custom content and more than.
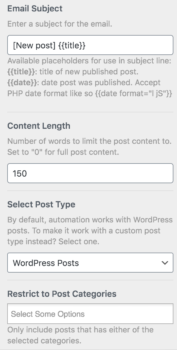
The Settings panel is where the the actual setup is done. Open up it to fix upward the e-mail subject and the maximum content length. You can also restrict the automation to specific categories, tags and authors. This is ideal if you want to send an email when weblog posts are added to a specific category in WordPress.
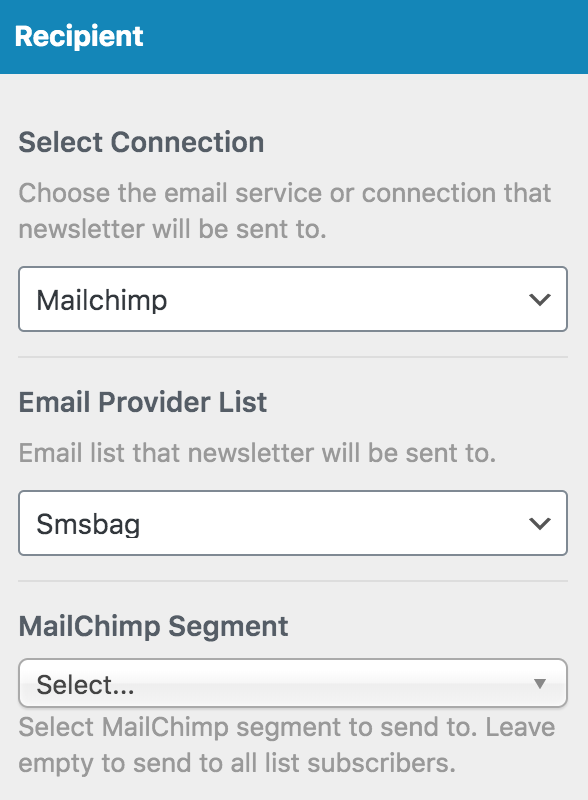
Next, coil down to the 'Recipient' department, select 'Mailchimp' and choose which of your MailChimp audiences (i.east. lists) the email volition exist delivered to:
When you lot are done, click the 'Save Changes' button at the meridian correct corner and and so toggle the activation switch to the right to enable the automation.
Step iii - Add a MailChimp signup form
Now, you need to provide a way for subscribers to sign up to receive new blog posts by email.
With MailOptin, you do not need a separate plugin or form solution to capture and save subscribers to your MailChimp list. Only follow the instructions in their documentation on how to create a Mailchimp signup form.

And that'southward it! Whenever you lot publish a new post in WordPress, MailOptin will email it to your listing subscribers - either straight abroad, or as a daily, weekly or monthly round up of newly published posts.
Method 2: Use MailChimp to transport new blog posts by email
This basic method allows you to ship new posts by email directly in MailChimp, without having to install any WordPress plugins. It works equally for wordpress.com or cocky-hosted wordpress.org sites.
Footstep 1 - Prepare your WordPress web log
Get your RSS feed URL
WordPress automatically generates an RSS feed listing all your blog posts. This is all you demand to integrate MailChimp with your WordPress website.
If you want your MailChimp emails to display all the posts that you lot add to your website then your RSS feed volition be https://your-domain.com/feed/ (e.one thousand. the RSS feed for this website is https://barn2.com/feed/).
If yous want to email your subscribers when you add posts to a specific blog category so the RSS feed will be the URL for your blog category followed pastfeed/(e.g.https://barn2.com/category/wordpress-spider web-design-blog/feed/).
Find the URL for your RSS feed and save it in a handy place, equally yous'll need to paste this into MailChimp later.
Of import notation: The trailing slash / is compulsory, and MailChimp will just recognize your RSS feed if you add it as https://barn2.com/feed/ rather than https://barn2.com/feed.
Displaying WordPress featured images in your MailChimp emails
 By default, any images that yous insert into the principal content area of your WordPress posts will appear in your MailChimp emails. However featured images will non because WordPress doesn't output them into the RSS feed.
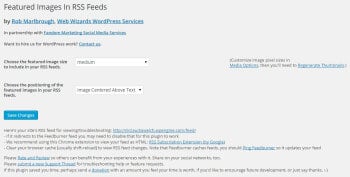
There'due south a handy plugin called Featured Images in RSS and MailChimp Email (what a mouthful!). This outputs the featured images into your RSS feed so that they are pulled through into your MailChimp emails.
But install and activate the plugin, go to Settings > Featured Images in RSS Feeds in the WordPress Admin, and configure the two settings. For best results, I recommend selecting the 'Medium' or 'Large' image size and 'Image Centred Above Text' for the position.
The plugin uses the image sizes that you lot accept set up in Settings > Mediaand so you can modify the size of your Medium or Large image size. Make sure your called image size is smaller than 600 pixels - if it's bigger than this, it won't fit into the available space in your emails (annoyingly, MailChimp won't make the images fit automatically).
Can I brandish other WordPress content types instead of blog posts?
Yeah! WordPress posts and ALL custom post type come with RSS feeds that y'all tin can use to transport alerts via MailChimp. You tin can employ exactly the same method to send e-mail notifications for new events, projects, eastward-commerce products and more.
Check out our divide article most how to send 'New product' alerts from your WooCommerce store.
Step 2 - Set up MailChimp to send your 'new post' emails
Create a campaign
A 'Entrada' is basically any email that is sent past MailChimp to your subscribers. The next step is to create an RSS-Driven Campaign which volition automatically ship your new blog posts to your subscribers.
- Go to theCampaigns section of your MailChimp account
- Click theCreate Campaignbutton in the top right corner
- On the 'What do you want to create?' screen, selectCreate an Email
- On the next screen, go to the Automatedtab and clickShare weblog updates. (This is the new way to send an RSS-driven campaign in MailChimp, and isn't easy to find!)
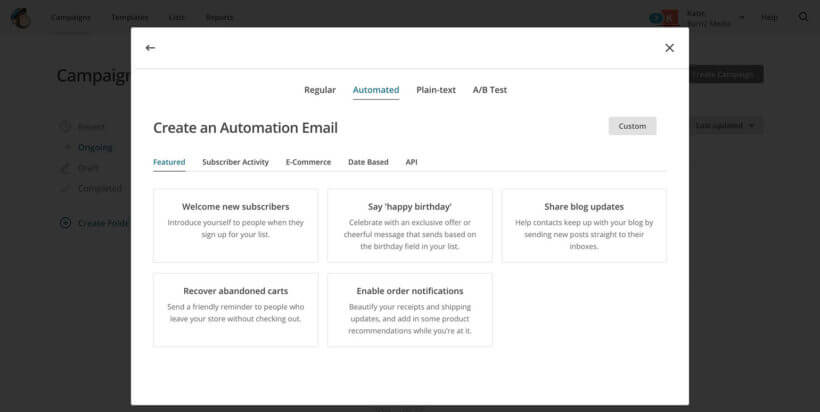
- Name your campaign and select which audition it volition transport to, then clickBegin
-
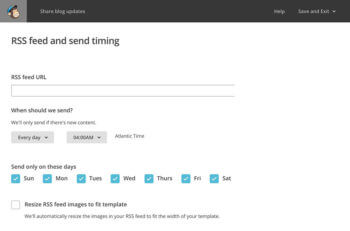 RSS Feed and Send Timing screen:
 - Add the RSS feed URL which you copied in Stride 1 - east.one thousand. https://your-domain.com/feed
- Choose how ofttimes the emails volition be sent and click Adjacent
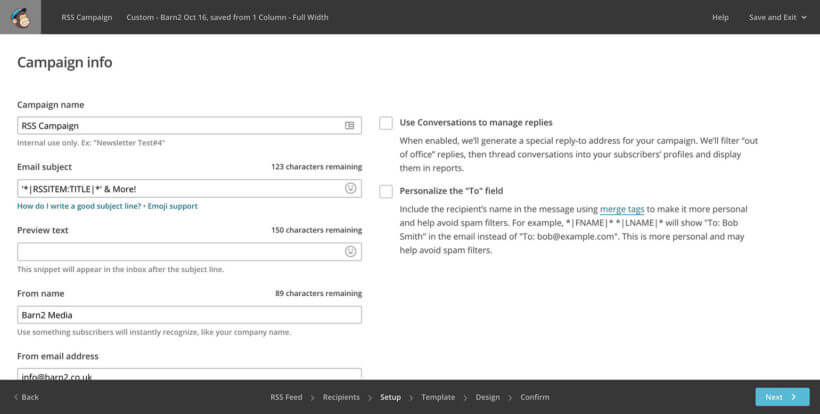
- On theTo which audience shall we send?screen, select the audience you created in Footstep ii and clickNext
- On theCampaign info screen, fill in all the information (email subject field, From name etc.) and clickNext
- Select whatsoever Template and then click through to the Design tab.
Create a dynamic email subject area line
You can use MailChimp merge tags in the subject field line, for case to include the title of your latest mail service.
For example, we apply MailChimp to send our own Barn2 blog posts and tutorials by electronic mail each week. The bailiwick line is '*|RSSITEM:Championship|*' & More! For example, if our latest post is chosen How to utilise MailChimp to send WordPress blog posts past email then the subject of the weekly RSS e-mail would be 'How to use MailChimp to send WordPress blog posts by email' & More than!
Now design your MailChimp RSS e-mail
Now you become to design the electronic mail that will be sent to your subscribers whenever you add a new blog mail service. This is fairly self-explanatory although you'll demand to spend some time familiarising yourself with it. Hither are some tips:
-
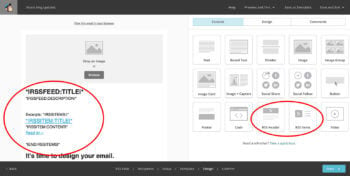 To automatically include your new blog posts in the email, you need to add together theRSS Headerand/orRSS Itemscontent block into your email. Detect this in the Content section of the Design tab. TheRSS Headerelement will add the title and description of your RDD feed and isn't essential. TheRSS Items block will add together the title, content and a link to each new post on your WordPress website, so this is essential!
 - Information technology'due south fine for you to add together your ain text before and after the RSS merge tags - for example, an introduction to the email. Just don't edit annihilation within the *| |* merge tags. If you desire to edit or remove whatever of the merge tags so you tin can read more near them at https://kb.mailchimp.com/merge-tags/rss-blog/rss-merge-tags. If the merge tags look scary and likewise technical for you so just ignore them and don't make any changes to the sections that comprise them, then you won't risk breaking anything
- MailChimp volition let you make various blueprint changes to the e-mail using the Styletab. This includes changing the groundwork colour, fonts, spacing, link colour, etc. Utilise these to style the electronic mail to match your brand, equally well every bit uploading your logo to the header of the email.
- Once you have finished designing your electronic mail, clickPreview and Test at the top of the screen.Enter Preview Mode lets y'all view how the email volition look on mobiles and full-sized screens.Transport a Examination Electronic mail lets you send a test email to yourself. Exam your email in both of these means before sending annihilation to your subscribers.
- One time you lot're completely happy with your email, clickAdjacent at the bottom right of the screen.
- On the next screen, check at that place are no errors. If everything looks good, clickStart RSS.
What'southward next?
At present your email is fix and will start being sent to your subscribers at the frequency you have selected. The email will just be sent when yous have added new weblog posts to your website, otherwise, nothing will be sent.
Stride 3 - Add a MailChimp signup form to your WordPress blog
At present everything is in identify, you need to create a signup form so that readers tin subscribe to your weblog by email. The best mode to do this is usually to add a 'Receive blog posts past email' form to the correct-hand cavalcade of your web log or website. Y'all tin can see this in activity in the sidebar of this page.
There are lots of WordPress MailChimp plugins that will add a signup course for you. I recommend ChimpMate Pro which is a popular choice. It's simple to ready, has great reviews and there'southward a gratuitous version as well as the premium version with actress features.
There are many other ways to build your MailChimp mailing list and I won't go into them all hither. For example, you tin can automatically subscribe people who comment on your blog posts, purchase in your e-commerce online shop, submit your contact grade, etc. Plan the all-time mode to abound your mailing list as role of your overall online marketing strategy.
At present start blogging!
Everything is now in place. Regularly add together new posts to your WordPress website and MailChimp volition have intendance of the residual.
MailChimp will automatically check when new posts are available in your RSS feed, and will email your subscribers at the specified time. Brand sure you subscribe to your ain list so that you receive the emails yourself. This allows you to spot whatever problems and make improvements over time.
Bonus tip #i - E-mail new web log posts to members merely
So far, I've assumed that your WordPress weblog is private and everyone can access it. But what if you want to mark function or all of your blog private and members-just? What if you only want to transport the emails to members?
Fortunately, that'due south easy too. Here'south how to do information technology:
- Install our WordPress Password Protected Categories plugin. Use it to password protect any or all of your web log categories.
- Use the instructions in Footstep ane, above, to get the RSS feed URL of the category (or categories) y'all wish to email to members.
- Follow the instructions in Step 2, above, to create a MailChimp Campaign to electronic mail new blog posts in the private category. Add together the password to one of the static sections of the email (outside of your RSS merge tags), with instructions to employ it to unlock the private blog. You may wish to create a Group or Segment within your MailChimp Audience for your private blog members, and ready the Campaign to merely transport to this Group/Segment.
- Finally, decide how members will sign up for the private weblog. If they have already joined your organisation separately and then you tin simply import them to MailChimp. Alternatively, you may wish to use a plugin such as Gravity Forms to create a MailChimp signup form that links with PayPal, then members take to pay to sign up.
The like shooting fish in a barrel mode to create a individual WordPress blog.
Bonus tip #2 - List weblog posts in an easy-to-observe table
Once yous've been blogging for a while (and emailing your new posts via MailChimp, of grade!), your weblog might kickoff getting harder to navigate. This is inevitable considering most blogs are listed in reverse appointment order, so older posts easily drop off the lesser - never to be seen once more. It's a shame because unless your posts are very time-specific, they can continue providing value well into the future.
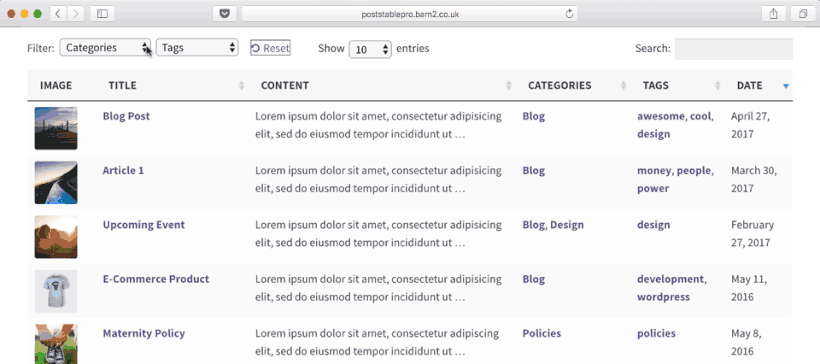
The solution is to employ the Posts Tabular array Pro plugin to list your posts in a more than searchable, sortable format with extra features such as search box and filters. Your blog readers can easily use these tools to find posts about their topics they're interested, regardless of when they were published. It'south the perfect mode to revive old blog posts.
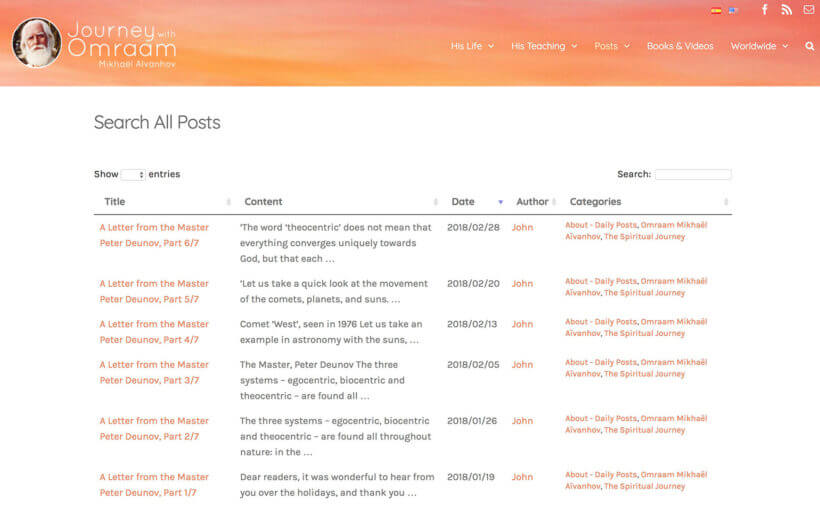
Y'all'll basically be creating a WordPress weblog index, which lists all your posts in an easy-to-navigate table. For case, Journey with Omraam plant that their blog was getting difficult to navigate as it grew. They list large numbers of weblog posts in a table with instant search above.
You tin can too add filters above the table of blog posts. This makes things even easier for your blog readers, as they tin can filter to find posts past category, tag, or any custom taxonomy:
This helps to proceed your blog posts agile and relevant, well subsequently they were first emailed to your MailChimp subscribers.
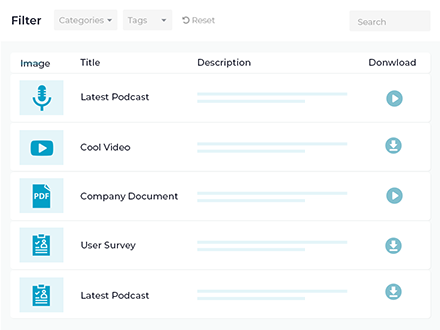
Listing information from your WordPress website in a searchable table.
Wrapping up
As you can run across, there are lots of means to integrate your WordPress blog with MailChimp, either on its own or using MailOptin!
And if your requirements are more than complex, then you tin combine this method with other WordPress plugins to add together actress features. For example, y'all can add fancy MailChimp signup forms or fifty-fifty make parts of your blog private so that only existing members can read them and receive the emails!
Source: https://barn2.com/mailchimp-wordpress-blog-posts-by-email/
0 Response to "upload mailchimp email to blog wordpress mailchimp automatic newsletter"
Post a Comment